
The picture below is one of the outlets I sealed the previous weekend (this is the A/C outlet). Notice how the contractors left wide gaps in the sheetrock around the plastic box (which is also recessed about 3/8 back into the sheetrock). I've filled in those gaps with non-toxic non-flammable acoustic caulk. I've actually worked on this outlet twice (first in February) to get the sealing to be this complete, smooth, and seamless, and to clean all the excess caulk out of the box itself, especially in and near the screw holes. The sealing will prevent air movement and VOC outgassing from the foam behind the walls.

It was cold and rainy on Saturday. On Sunday, after warming up, it was warm and sunny, but I didn't manage to get out until around 6pm (daylight time...5pm old time which was stamped onto pictures) and then worked until about 8:30pm.
I took the picture above of the one of the 3 outlets I finished sealing last weekend, and checked out the ceiling fan box with the dowels I bought.

The biggest hole around the box (at the 5:00 position above) is apparently too big for a 1/2 dowel, I determined last week, but on Sunday I found that my 3/4 and 1" dowels were too big. Perhaps I need a 5/8 dowel, or perhaps the small dowel that I tested last week was actually 1/4 instead of being 1/2. Anyway, I'll have to get another dowel, which is going to be cut and glued into the hole, with the rest of the gap around the metal plate filled with acoustical sealant. I was hoping to glue the dowel today and do the sealing later, now it looks like the dowel gluing will have to be done later, hopefully this week.

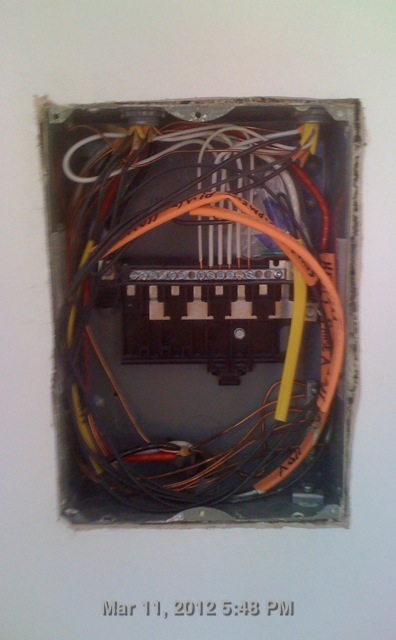
I sealed around the switch plate (the "before" showing gaps left after last month's sealing is above), and 3 of 4 sides around the electrical panel. By 8pm it was getting dark and surprisingly cold, so I quit at that point. Some spots of caulk around the edge of the electrical panel pulled out when being tooled and will need to be redone when the third side is done. When I peeled some stray caulk on one of the black electrical wires, it seemed to remove the black coating on the wire. BTW, that was the wire for the audio equipment outlet. I should remember to point that out to the electrician, though I think the wire will be trimmed back farther than that point anyway. The picture below shows the electrical panel before sealing started. Much of the work involved removing excess from screw holes using toothpicks; I've used something like 100 toothpicks on this job so far.
No comments:
Post a Comment