Lyndhurst Garden House

Lyndhurst Garden House

Friday, March 30, 2012

Duct Seal Finally Obtained On Second Visit to Lowes

The Lowes website said that the store closest my office had 13 packages of Duct Seal.  So I wandered down there after dinner on Wednesday and spent 45 minutes not finding Duct Seal.  I personally looked in electrical, sealing, sheetrock, and other sections, and had Lowes salespeople look also.  Nothing was found.

So Wednesday night I ordered one package online for onstore pickup from the same store.  It could not be ordered through mail order, through truck deliver was available (I didn't check the cost, that typically costs $50, whereas one package of Duct Seal costs less than $3.)

On Friday I brought my order paperwork, and a picture from the Lowes website down to the store.  I also looked for myself in sealing and electrical again.  Finally, after 45 minutes, the duct seal was found by an employee somewhere near the floor in the electrical section and brought to the Customer Service desk.

Nobody knows what they actually have at Lowes (except the computer, and it often doesn't say where it is).

You would think "Duct Seal" would have something to do with A/C ducts, but the name is apparently historical, and the current purpose is to seal electrical boxes.  The key property of Duct Seal is that it won't harm vinyl, polyethylene, or other materials found inside an electrical box.  It's a clay-like material which is non-hardening.  Nevertheless, so few people actually do this that Duct Seal is not exactly flying off the shelf.


Thursday, March 29, 2012

Storm Passed

I've continued keeping the doors open to Lyndenhurst to get good outgassing.  On Wednesday there was a slight chance of rain, but I didn't have time to close the doors before leaving for work at 4pm.  Around 9pm a very spotty and irregular storm came by, with 10-12mph winds from the SE which the doorway is vulnerable to (because it is facing east).  Where I work, 21 miles away, there was no rain at all until 12 midnight.

By 1pm, when I was driving home, the rain was so bad I couldn't see the road lines for my usual exit (and the lights were out).  So I had to drive two miles further, in the waterfall like rain, before I could turn around to go home.  I had almost as much trouble navigating the exit on the other side of the freeway.  With all this rain, I didn't bother to get the mail or to go out to Lyndenhurst to close the door.  From my bedroom window, using a flashlight, I could see that there was water on the floor, and it looked like it might go all the way back.

I waited and waited for the rain to blow over.  (It never seems to blow over while you are waiting for it to do so.  It immediately blows over when you would rather it keep going.)  Finally, it had reduce to mere light drizzle when I went out around 2:30 to close the door.  After I went out, of course, the rain stopped completely.

The tile floor was only damp for the first three rows of tile immediately in front of the door.  Everything else was perfectly dry.  No doubt it helps to have 18" overhang in front, and the house 22 feet to the east helps moderate winds from the east.
  

Thursday, March 22, 2012

First Bamboo

On Sunday, my friend took me to Schulz nursery on Broadway to get a bamboo plant.  I had previously called, and they said they had Bambusa Alphonse Karr for $99 at 6 feet.  When we got there, I didn't see any Alphonse Karr over 5 feet, and the yhad lots of brown leaves, but fortunately the price was only $59, so I got one.  My friend helped me install.  She said the pot had been watered, so it didn't really need more watering, but I soaked around the plant thoroughly for 5 minutes with a garden hose.  It always seems to me that women are too much afraid of overwatering, or perhaps obsessively concerned about water waste, and rarely water new grass or plantings sufficiently.  I shared this observation with my friend.  At least she agreed I could water as much as I wanted, so long as I didn't blame her for killing the plant from overwatering.  Back in 2008 when I had 5 cu of lawn grass installed, I measured how long it takes to get to 1" of water over a small area.  It takes far longer than most people imagine.

Then, the following night, there was a very heavy thunderstorm, so even I have to concede the plant got enough water for good installation.

I think my watering may have also helped secure the plant by getting the potting soil (lining the hole and above it) to meld with the native clay soil.  I'm not saying they are thoroughly melded yet, that will take a year or so, but some good stiff waterings help. And I think this may also have been part of the reason the plant did not blow over in the very heavy thunderstorms (which came with high winds and tornado warnings) the day after planting.  The picture above was taken two days after the thunderstorm.

With a maximum height of 30 feet and average height of 20 feet, Alphonse Karr is ideal for my privacy hedge.  I need at least 12 feet for good privacy, but way beyond that is unnecessary.  Other Bambusas such as Kimmei, one of my favorite looking ones, can grow up to a maximum of 55 feet and average 30; that would be way too high for my small lot.  And Bambusas are the sun tolerant clumping bamboos, the kind best suited to me and my location.

I've placed this first plant in the sight line from a neighbor's shed (three houses north) and my workshop window.  That shed looks to be about the same size as my workshop, and has a doorway and window facing my shed window.  At night, it's even lit up, so there might often be someone in there.  Because of the slope of the street, the rows of privacy fences in between us do nothing.  Like most such things, this may not be a real privacy issue.  The neighbor probably doesn't look my way much and they probably can't see much, especially when I'm inside the workshop, even when they do.  But inside my workshop, looking out the window, it's unnerving to see someone else's window staring right back.  When this bamboo plant grows above the 6 foot fence, it will help block this view for a better feeling of privacy inside the workshop.

Ceiling sealing now pretty good but

The electrical box for the ceiling fan is now sealed adequately as shown at left.  I didn't see any holes except a tiny spot on the big gap at 8:00 in the picture at right.  I'm not sure if that spot is a tiny hole or a spot.  When I was finishing up the sealing last Sunday (I worked on it Saturday and Sunday) I rubbed around the perimeter of the sheetrock with my finger to remove excess caulk, and that is when that tiny spot appeared.

I checked it out and took this picture on Wednesday, and observed that there is a slight depression in the largest hole area (that same one at 8:00) that could be filled with a bit more caulk, and I will do so, and that should fill or cover up the spot that may be a hole.  I could do some more caulking also, to make the junction more beveled as I have done for the outlets, but that's hard work especially on a ladder, so I'm not sure if I will bother.  (Some of the hardest work is mainly in the cleaning up after the caulking, making sure not one dot of excess caulk is on the sheetrock or inside the electrical box.)  And then paint over everything.  I'm not sure if I will do all these things, actually I think the perimeter sealing is now (finally) done sufficiently well just to move on.  In case you forgot, this is what it looked like before the caulking (that's like night, and the above is day).

I have also been planning to add a ceiling medallion.  Most people would just put on ceiling medallion and not worry about the sealing behind it.

Intermediate to the two pictures above, I could have taken a picture when I used wood glue to glue in a 5/8" dowel into the big hole.  I glued that in place on Saturday.  It fit nicely at a slight angle, so I didn't need to use any tape to hold it in place.  After doing that gluing, I did a first pass at sealing all the other gaps around the box, then after 24 hours to let the glue dry, on Sunday I sealed the big gap with the dowel in place, and I resealed a few places where holes or depressions had appeared in the caulking. Before sealing the big gap, I tapped on the dowel to make sure it was being held firmly in place with the glue.  Here's a closeup of the big gap after sealing, note that you can't see the dowel or anything underneath the caulk:


But now I notice that there may be air blowing through the small holes in the electrical box itself.  It looks like the box is screwed down to a wood joist, but apparently that doesn't seal it perfectly.  Now I need to investigate how I could seal the holes in the electrical box.  I don't think caulk can be used, as only materials approved by an electrical authority can be used inside a box.  I was thinking I could cut some of these outlets sealing (so they say) foam pads to small circles and stuff them into those holes.

The ceiling box is particularly important from a sealing perspective because the spray foam insulation doesn't come all the way down to the ceiling sheetrock to prevent airflow and mixing.  My attic is not very large (you couldn't actually store much stuff there even if it was open, I don't even think a single row of bankers boxes would fit down the center line under the roof peak), but there is almost a foot or so of free air space (note that the attic is by design a unvented attic enabled by the use of closed and open cell spray foam under the roof deck...this was a very expensive approach).  VOC's can accumulate in that free air space from any part of the attic foam, mix within the free air space, and then flow down into the room if there are any unsealed gaps.

In vented attics, the sealing between attic and living space would be even more important because a vented attic can exceed 140 degrees in summer.  My highly insulated attic should not deviate that much from room temperature, in fact from a thermal standpoint I could remove the entire ceiling, but I'm still worried about the VOC's blowing from attic into room.


Wednesday, March 14, 2012

5/8 just right

On Monday I got two new poplar dowels at Lowe's, one at 3/8 and one at 5/8.  I got the 3/8 because I wasn't entirely sure that the very first dowel I tested, which was too small, wast 1/4 instead of being 1/2.

5/8 turned out to be the correct fit.  Now all I have to do is cut the dowel to about 3/4" length and glue it into the sheetrock hole.  I've been debating whether I should use QuietGlue Pro or a high quality white glue I purchased recently.

I took a look at the caulking around the switch box and panel.  They actually looked pretty good except for the tiny gaps I knew I needed to fill and the unfinished side.

I can still smell the oil based paint (now I wish they had not used that) and the tile grout.


Monday, March 12, 2012

Slow progress on sealing

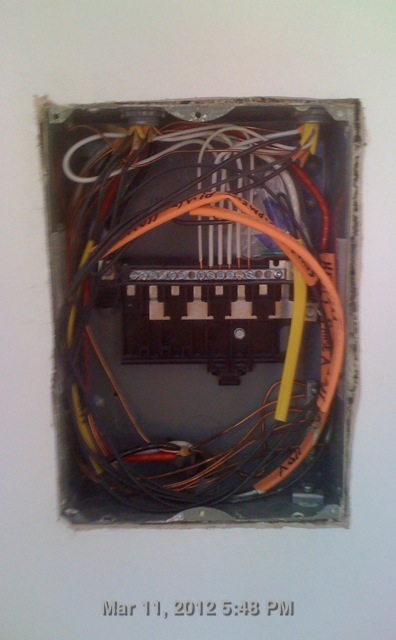
The picture below is one of the outlets I sealed the previous weekend (this is the A/C outlet).  Notice how the contractors left wide gaps in the sheetrock around the plastic box (which is also recessed about 3/8 back into the sheetrock).  I've filled in those gaps with non-toxic non-flammable acoustic caulk.  I've actually worked on this outlet twice (first in February) to get the sealing to be this complete, smooth, and seamless, and to clean all the excess caulk out of the box itself, especially in and near the screw holes.  The sealing will prevent air movement and VOC outgassing from the foam behind the walls.


It was cold and rainy on Saturday.  On Sunday, after warming up, it was warm and sunny, but I didn't manage to get out until around 6pm (daylight time...5pm old time which was stamped onto pictures) and then worked until about 8:30pm.

I took the picture above of the one of the 3 outlets I finished sealing last weekend, and checked out the ceiling fan box with the dowels I bought.


The biggest hole around the box (at the 5:00 position above) is apparently too big for a 1/2 dowel, I determined last week, but on Sunday I found that my 3/4 and 1" dowels were too big.  Perhaps I need a 5/8 dowel, or perhaps the small dowel that I tested last week was actually 1/4 instead of being 1/2.  Anyway, I'll have to get another dowel, which is going to be cut and glued into the hole, with the rest of the gap around the metal plate filled with acoustical sealant.  I was hoping to glue the dowel today and do the sealing later, now it looks like the dowel gluing will have to be done later, hopefully this week.


I sealed around the switch plate (the "before" showing gaps left after last month's sealing is above), and 3 of 4 sides around the electrical panel.  By 8pm it was getting dark and surprisingly cold, so I quit at that point.  Some spots of caulk around the edge of the electrical panel pulled out when being tooled and will need to be redone when the third side is done.  When I peeled some stray caulk on one of the black electrical wires, it seemed to remove the black coating on the wire.  BTW, that was the wire for the audio equipment outlet.  I should remember to point that out to the electrician, though I think the wire will be trimmed back farther than that point anyway.  The picture below shows the electrical panel before sealing started.  Much of the work involved removing excess from screw holes using toothpicks; I've used something like 100 toothpicks on this job so far.


Wednesday, March 7, 2012

How much insulation is enough?

Here is an interesting discussion over at Green Building Advisor.

For hot climates like mine, he recommends a 3-5-10-20-60 rule, i.e. R60 for the ceiling, R20 for the walls.  For cold climates, he changes the walls to R40.

I have roughly and nominally 1.5 inches of R7 closed cell spray foam, combined with 4 inches of R4 open cell spray foam, on all walls and roof deck.  (Possibly a bit more on ceiling since all 2x6's are fully covered.)  That computes to 26.5.  So I'm a bit above recommendation for walls, but a bit below recommendation for roof.

I had to struggle to get this much, the contractor insisted that 1.5 inches of the closed cell foam was enough, and claimed that was all they had agreed to (I had thought we had agreed to 5.5 inches of closed cell foam).  Finally we worked out the closed and open cell combo deal for a small added cost, and I was happy with it for sound reduction reasons.

On the plus side, I also have white coated metal roof supported by 3/4 plywood.  Foam also prevents heat transfer through air leakage, and I have a sealed attic (or it will be sealed when I'm done sealing it).  The white coating reflects about 70% of solar energy right away while most dark roofs only reflect about 25% of the energy or less.  The walls have siding, sheathing, and sheetrock, which all add some thermal benefit.  Exterior walls are painted a very light color.  All and all, from energy performance standpoint, I think I've done quite well, which is what I intended.  But the point is how hard it was to get to this point.  Though it isn't specifically itemized, the contractor claimed I was getting $4000 of insulation, including $3000 for the very costly first 1.5 inches of closed cell foam.

The discussion brings up that we should really be dealing with UA, total energy loss, rather than numbers like R, to set targets.  Have R60 roof and R20 walls does little if the building is covered with windows and doors.  Speaking of which, I put no doors or windows on the south and west sides.