 |
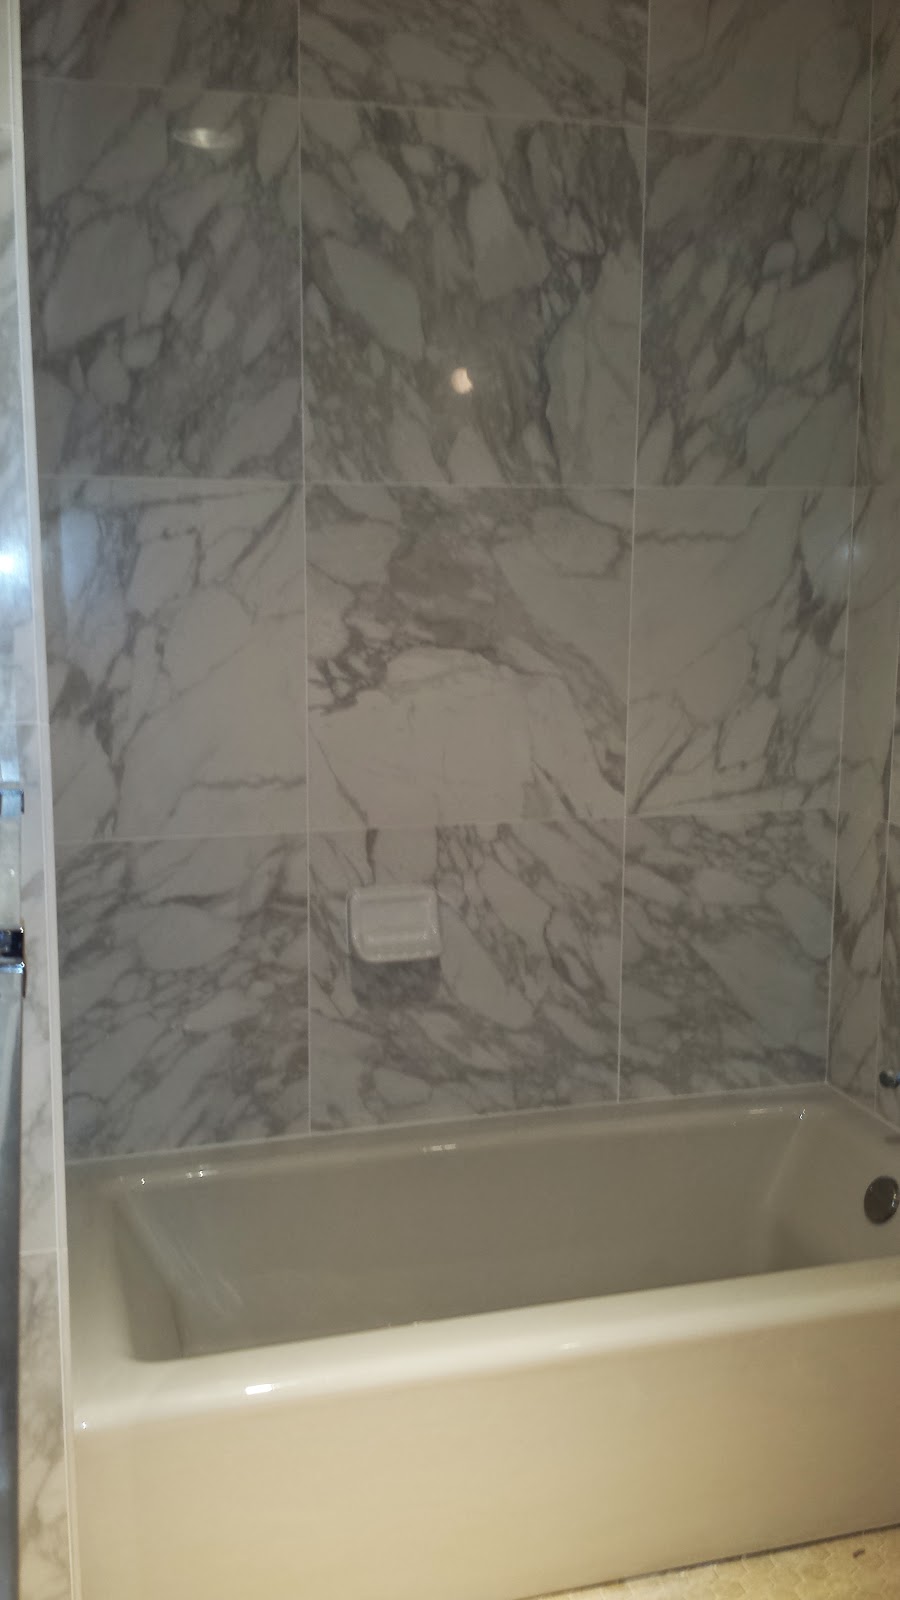
| New Tub and Calacatta Porcelain Tile |
I am very happy with the new tile and tub in my master bedroom. It's beautiful! Everyone who sees it is blown away by the fantastic beauty of the Rex I Bianchi Calacatta Porcelain tiles filling the entire shower enclosure area including the furring inward. Those tiles must be experienced, with their wonderful endlessly complex patterns and varying color depending on light and angle. Close up the lines do not appear black at all but grey and/or gold. I think the Kohler 32" wide Bellwether tub in Almond is fantastic looking also. I still believe Kohler's Almond 47 is the prettiest color even if it might not match the tile as well as ugly Kohler biscuit (I have never done the comparison actually) but Almond matches close enough and even helps bring out the gold in the tile up close. With contoured front and back, the 32" Bellwether is a mini Tea for Two and has comfort as well as ultra modern looks. The valve trim is not yet done. The tile setting and grouting is done very well if not to museum perfection, well enough to let the tile on the back, especially, speak for itself. The niche in the left side is wonderful and convenient but the cuts required were not laser perfect and there was even a tiny bit of edge chipping on the detailed cut pieces, and fraction of a millimeter misalignment. I'm being picky here to give you the full picture. But the back is mostly made of full pieces which look perfect, and the right side looks perfect also. The tile reaches and is sealed to the ceiling, as is the backer board (by request). I would consider this A class work, if not A+ (and the general helpfulness of the tilers would entitle them to an A+ for overall service anyway, in my grade inflated evaluation, despite details described below which are typical of almost all contractors). The Tile is A+++++, the best.
It's hard to get a full height picture with my cell phone because of limited wide angle, so the above was the best I did before the new flooring installation, intended to show as much height as possible since the new tile goes all the way to the ceiling.
My initial impressions are also that the bathroom is less cold than before. It has an engineered vent to my HVAC system (by the book) and no exterior windows. So you'd think it would be as warm (when cold out) as any other interior room. Yet, before the new tile it could sometimes be a bit on the chilly side, mostly probably due to air leaks in the broken tile wall and up by the ceiling. Now there are no visible leaks, and the tile seals all the way to the ceiling. The final tiling job was done much better than I was thinking while it was being done (there may be some inconsistencies in the tiny grout lines…but I am seeing far worse in commercial work elsewhere now that I've started looking at grout), including the sealing to the ceiling. Previously there were big holes near the ceiling where the original track home builder covered a generous ceiling gap with lightly mudded paper which was tearing to shreds over the years. And sealing is more and more understood as the most important part of insulation. The photo before demolition below unfortunately doesn't show the ceiling paper cracks I'm describing
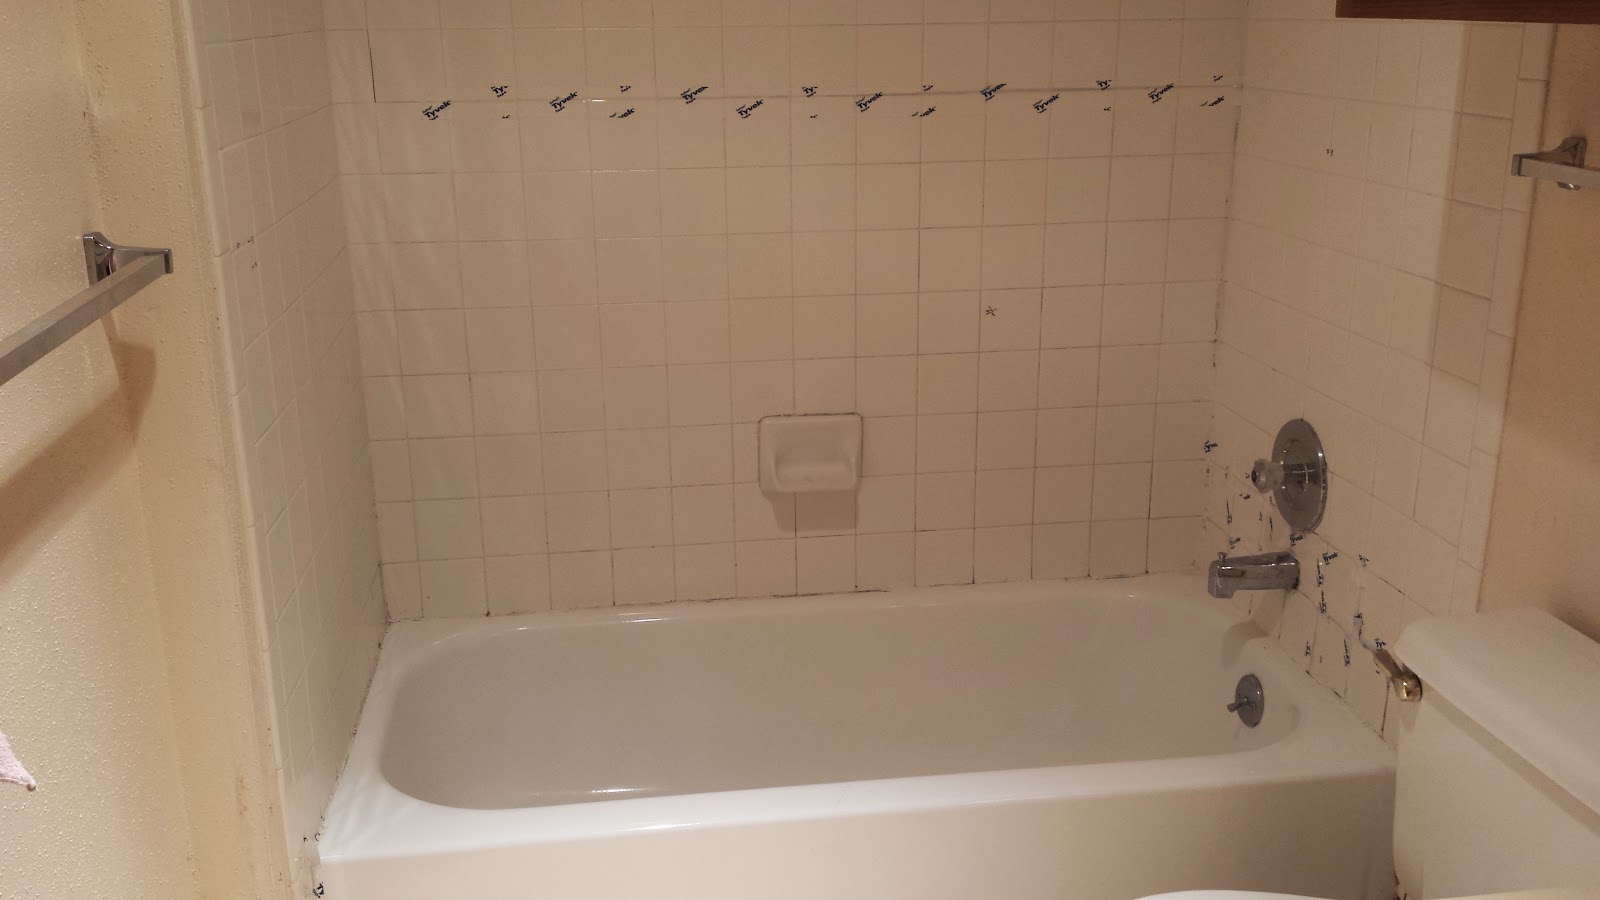 |
| Original Tub and Tile Just Before Demolition |
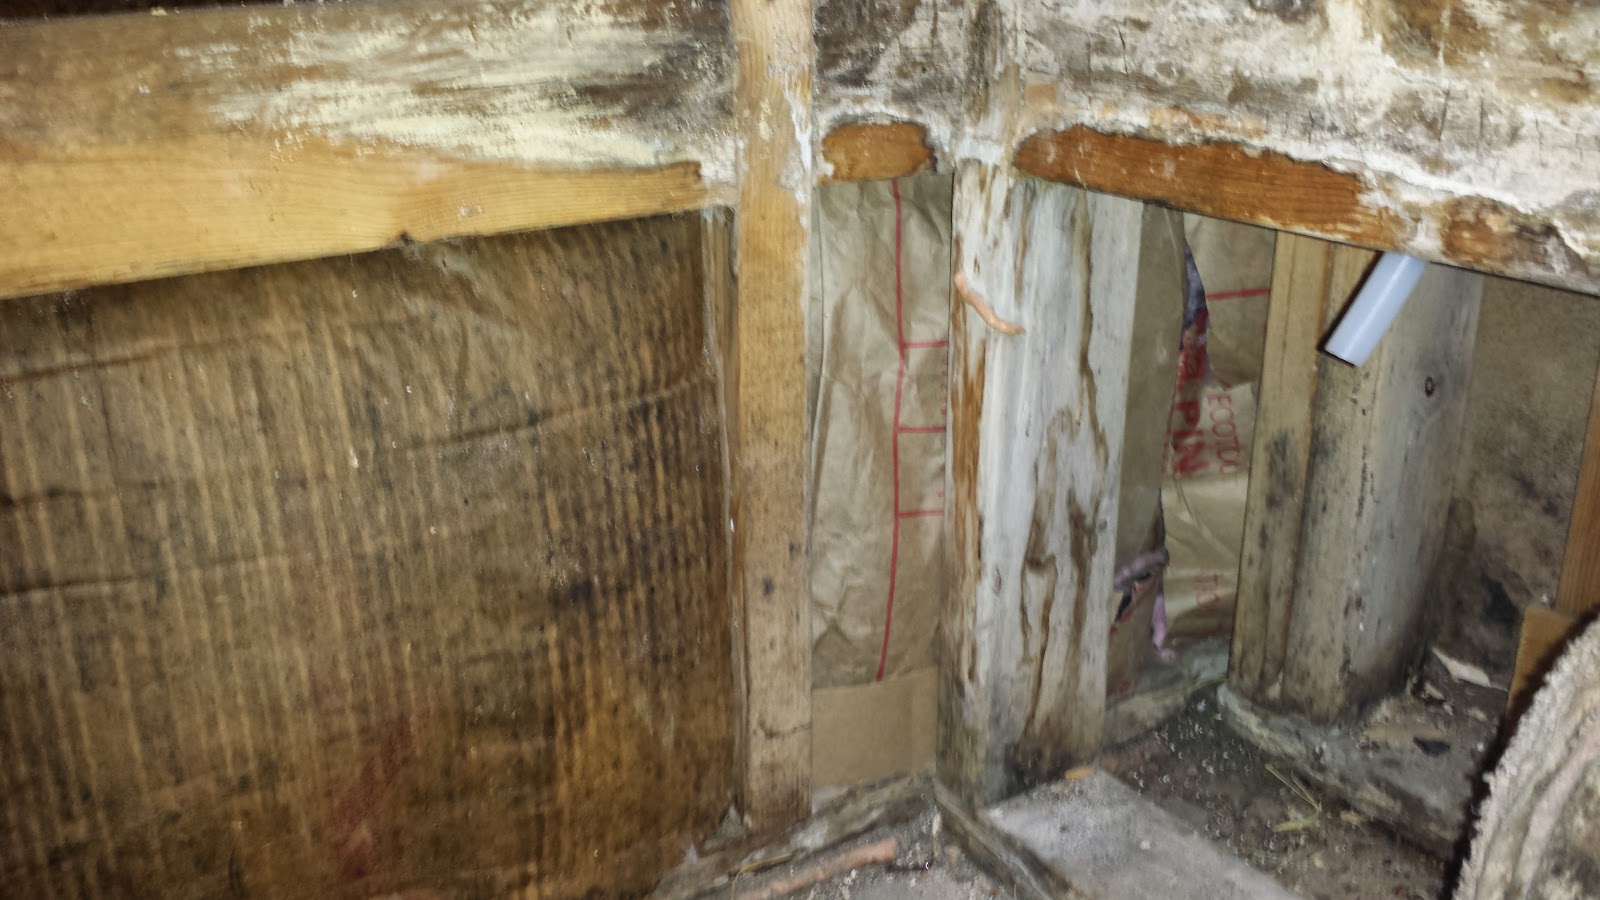
But I know it's not perfect underneath. After the tile demolition I sealed, mostly, an uninsulated exterior panel behind the plumbing void that runs down the center of the house and also opens up into the under-tub area. I think that might have helped a lot. That one missing piece near the access panel through the refrigerator bay has a long story behind it…I removed the original piece 20 years ago when we bought this house as abandoned and I was clearing out an in-house ant mound behind the refrigerator bay, or what seemed to be an ant mound, and I started pulling on something awful looking, which turned out to be a piece of insulation. I pulled out the entire piece and intended to fix it, but forgot after a few months.).
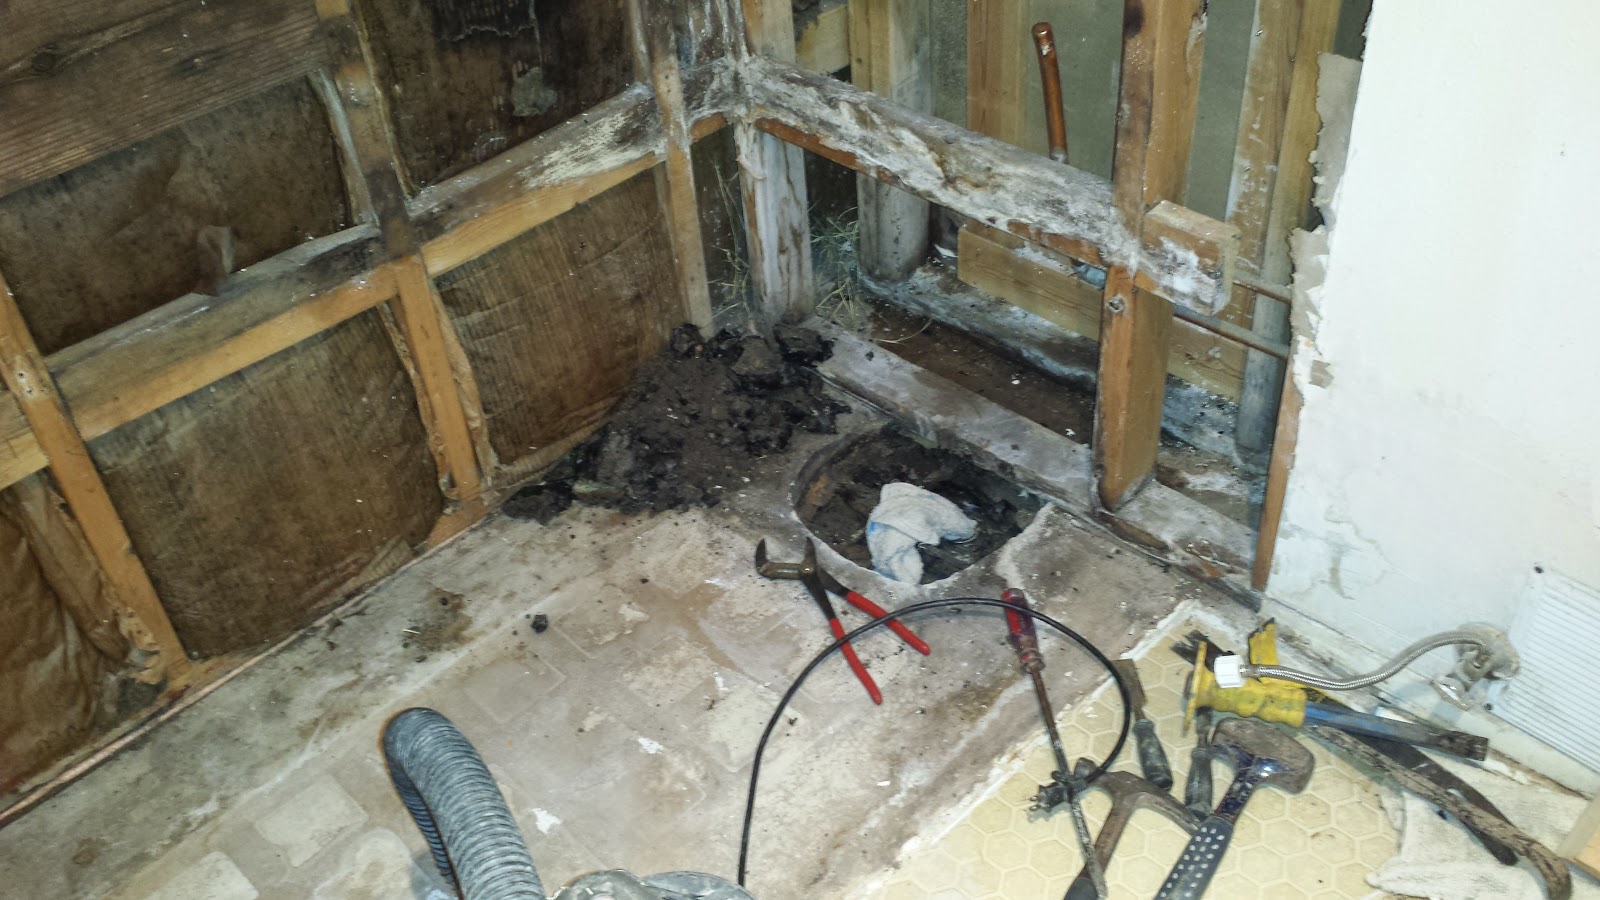 |
Corner behind and under old tub had missing insulation
(upper middle of photo) |
 |
Insulation fixed by me, with bottom and side pieces to completely fill gap
(however, space behind beam above is not filled, I hadn't counted on that space) |
But I had been hoping to get most of the old ratty looking fiberglass above the tub replaced. I had held back on making any requests in this regards, figuring it was too late to get someone who would do it right (my builder Tom). After the demolition, the rightmost panel of fiberglass had rotten looking paper, but most fiberglass backing was intact, and the exterior was fully stuffed. I figured the rotted looking paper was largely a superficial problem of little consequence to insulation quality:
But then after the tub had been installed, the paper had gotten quite torn all around, especially where it had been rotten looking before:
 |
| Right side, after new tub installed |
 |
Left side, after tub installation
|
Then, the day before the tile installation began, I asked the tile company about it, and they said they would replace the bad insulation. I offered to let them use my barely-used roll.
I told the installers about this, and they agreed. I said at least the first two rows, maybe everything. I saw the first (and most torn) piece of old fiberglass going down the hallway. Than another. Maybe more, I closed the door after that point. But I didn't actually watch the work being done, until much later when the door was open I peered in. And what I saw was that only two of the stud bays showed new fiberglass, and one of them showed a gap varying from 1-2 inches at the top. The old fiberglass had been installed with no gaps. Now there was at least an unacceptably large gap at the top of the farthest right row. Only the portion above the cross piece was visible on the next row, so I don't know if fiberglass had been repaired there. When I later rolled up the fiberglass, it seemed they hard hardly used any. They couldn't have replaced more than the first two stud bays of insulation, and possibly only one.
I don' know how much fiberglass was replaced, but seeing how they left gaps where they did replace it, perhaps it's fine that they didn't replace much. That's what I thought when I saw the gap. By that time the backing board had almost been completely installed, with only the last few inches visible above. (BTW, the backing installation looked as superb as I could imagine, though I am no inspector.) It was too late to change any insulation covered up, and it would be a big hassle even to fill the gap up top. I felt better to leave the guys alone to doing a very nice tile installation. I could hardly ask for perfection on this re-insulation as it was an "extra" and these guys were tile specialists, not insulation specialists. Though it does bug me that nowadays all builders should be insulation specialists, and hole fillers, given the increasing importance of energy efficiency.
I think an optimal remodel would have replaced all the old fiberglass, and done so at code level or better. And of course all holes filled.
As far as holes generally not getting filled…I could write a book on that by now. Even with the best builder I now know, Tom, working himself, when I ask for it, I can get serious crack filling done. But if it's too weird, such as grade level behind the baseboard, he won't take much time on it, and I may well (I did in the King's room) reseal it again myself. With Rob, it seemed impossible to get him to even seal behind the baseboards. Sealing behind the baseboards is contrary to the first rule of contract building: quickly cover it up. And the second rule is: what's covered up and can't be seen doesn't matter.
Now I did that evening observe some gap between the otherwise perfect backing board and the ceiling.
I asked for that gap to be filled with mud, as contractor Tom had done in the King's Room. The tile guys easily obliged, and the result was almost but not quite sealing perfection. I decided not to rag them further..perhaps that small hole in the back left corner would be useful for tile or grout installation or whatever, and would cause a problem if they tried to fill it completely. Probably not, but I don't like to be too pushy, so my artists can concentrate on their craft as they know it, and not get distracted by me when it's only super trivial. The rest of the sealing is wonderful--and I bet it's not usually done, but I got it because I asked for it.
Still, things like sealing fan boxes to the sheetrock, I just know I have to do myself, and have done so, for three new fans since 2012, and many outlet boxes also.
I've now tested the inside of the tiled area with an IR thermometer. Surprisingly there is little particular variation over where I saw the slight gap on top. In general, the first stud bay area is about a degree or so warmer than might be expected in the middle, then only average at the very top. So perhaps the new fiberglass in that area helped, but the gap in fiberglass didn't. Best would have been new fiberglass everywhere.
The tile exterior wall is nonetheless colder than it should be everywhere, in the range of 59-65 when the interior wall is at 71 degrees (and it's freezing outside).
I think the problem now mainly is most likely exterior gaps. Cold air is getting into the stub bays. If cold air leaks in, the insulation doesn't help much anyway. I need to study the outside with IR, which I rarely remember to do, or don't feel like doing. Or even get professional examination. I've seen $99 IR cameras for smartphones too, and that looks interesting.
Anyway, there are bigger holes. Such as the fireplace, it seems, is one of the coldest places inside the house, I've determined. The flu has been snugly shut since forever, but the metal piece itself most likely is uninsulated and draws cold into the house. I need at least a fireplace door, or maybe seal the whole thing up. But I'l also worried about the acoustics. Anyway that's a big unsolved hole. As is the garage conversion suspended ceiling, but that ideally requires a complete rebuild with walls extended to the true garage ceiling--then get that insulated. Strangely the hall bath is another cold place, and yet it's an all interior room with no exterior walls. It does seem that a cold spot is the ceiling exhaust fan, but also the side wall which faces the plumbing void.
But the mainstream of builders seems to be well away from accepting what I might call the theory of no holes. No holes is better than some, and the fewer the better. Holes at any layer are bad, even when easy to cover up. Each layer of construction should be continuous from end to end. It doesn't take very much thought to understand this. Any hole is a thermal bridge and possibly also a leak.